
Hi! This is Wendi, and I am the project manager for our Q2 community outreach quilt.
Once again we've agreed to make a quilt for Fisher House of the Emerald Coast supporting their silent auction and gala, a major fundraising event which benefits military and military families during times of medical need.
The vision for 2017's quilt is a bed of roses - literally! The blocks are improvisationally pieced roses inspired by Corey Yoder's Newtown Auction Pillow. Corey used a Quilt As You Go (QAYG) method, but our roses are going to remain unquilted until the top is put together.
Using the method below, you may create roses any size between 6" and 18". As you can see, these blocks are not square, so you will have estimate their size. They can be any color that you might see actual roses growing in a garden, although you might wish to stay away from white, since our background is going to be low volume on white. The blocks are super scrappy, but try to stay within one general color family - reds, oranges, pinks, yellows, etc. It's ok if your fabrics have other colors in them, but the fabrics should "read" your primary color.
So get out your scrap bag and let's get started.

Choose a small scrap of yellow or orange for your center. Since my block is going to be orange, I chose yellow. If your block is square, cut some of the corners off so that it is NOT square. I like to start out with 5 sides.

Tip 1: Since the pieces in my scrap box tend to be very wrinkled, I find it helpful to press each piece before I sew them together. You may use starch, but I find that a light sprinkling of water or steam works well.
Tip 2: Since some of your edges will be on the bias, be careful not to stretch too much when you stitch and press.
Tip 3: Be sure to use a 1/4" seam. Seams that are too narrow tend to fray and pull apart, and we want our quilts to have quality construction.


Repeat, building your rose "log-cabin style", adding a new strip to the next side in order, although it doesn't matter if you build to the left or to the right each time.

Stitch.


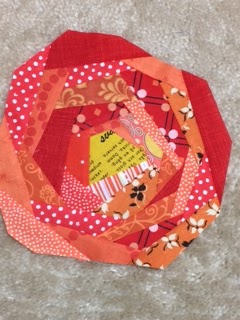

I try to balance the colors to avoid all the darker fabrics being on one side, but honestly, no matter how you put them together, these "roses" are pretty.


Beautiful, Wendi! I'm ready to start on this! Looks fun!
ReplyDeleteSo pretty. Does the committee add the neutral background to tie all the roses together? That is, do we just make the rose itself or do we add a neutral to form a square block? from Mary McFarlane
ReplyDeleteYes, just make the rose itself. Thanks for the question.
ReplyDeleteThanks, I have made three, they were really fun and used up some scraps. Will send photo later.....
Delete