Showing posts with label improv. Show all posts

November Block Lottery - Improv Triangles with Hand Stitching

Laraine's Improv Triangles - cool handstitching!
It's Loree's block this month and she has put together a beauty with two things she loves - improv and hand stitching.

Prints you need for the triangles:

  • Black and white
  • Gray - low value - think low volume - no darks
  • Beige - low value
  • Pink - low value - think pastel
  • Brown - any value
Background - Kona Geranium only

Handstitching in black embroidery floss - 3 strands preferred

Instructions:
  1. Cut a piece of Kona Geranium fabric 11 1/4" X 11 1/4"
  2. Make an improv triangle of any size and shape not to exceed 10" in width or length
  3. Lay triangle on top of background fabric, the bottom of the triangle should line up with the bottom of the background fabric. A little wonky is good!
  4. Lay ruler along the right side of the triangle, cut, and slide piece to the side. This becomes piece #2.
  5. Repeat along the left side of the triangle. This becomes piece #1.
  6. Save the Geranium triangle you just created for another project.
  7. Sew piece #1 to the left side of the improv triangle. Press. Trim.
  8. Sew piece #2 to the right side of the improv triangle. Press.
  9. Trim entire block to 10" square.
  10. Add black running stitches with embroidery floss. This can be a little or a lot - your choice - Required!
  11. Repeat and make more =)
Have fun with this improv block!

3/4 Log Cabins - April 2018 Block Lottery Info

For the month of April, Pat is taking a turn at hosting our block lottery.
from Pat
She picked a bold and modern 3/4 log cabin that is anything but traditional!
from Bobbi and Cindy
Pat's inspiration is from the blog 'you know what I love?' by Ara Jane Olufson a quilter from the other side of the country, Seattle.   Like many blogs now, hers has succumbed to inactivity, but if you click around, you'll find beautiful quilts and several tutorials.  

Read about the planning and design thoughts for Ara Jane's quilt blocks and tutorial here.  We are making ours exactly the same way.  It does involve a little bit of improv piecing, but it's not crazy improv piecing if that makes sense.  
from Pat
Pat started with a pile of richly colored solid fabrics which she cut into various size strips. The point of having different width strips is where improv piecing comes in to play - each log cabin will have three sides of the same color, but they can be different widths.  
from Pat
You could also work from scraps building out your blocks from what you have on hand if you don't want to cut yardage.
from Cindy
Some of your cabins will be singles measuring 12.5" x 12.5" once you've added three or four rounds (or five!!) of color and trimmed to size. 
from Linda
Some could be doubles, stacked on top of each other or nestled side-by-side to get to that all important 12.5" x 12.5" measurement.
from Bobbi
Variety in colors, as well as variety in the scale of your cabins within the individual blocks are more improv components.
from Loree
Play.  Have fun.  Make colorful blocks.  
from Cindy
You know you want to win!  

We owe big thank yous to Pat for bringing this block to our attention, to Ara Jane who enthusiastically gave her support and permission allowing us to link to her tutorial, and to the makers (Pat, Bobbi, Cindy, Linda, and Loree) for the samples pictured in this post. 

Bits of Friendship

Mary, writing about her thoughts for the February 2018 block lottery, says this:

"The block combines several elements I enjoy...a basic nine patch with improv variations.  It uses bits and scraps from friends and myself in Canada for my Florida friends, and is a natural colour combination for February of white with reds and pinks.


I am calling it 'Bits of Friendship'.  My modern group at home (Pine Tree Quilters Guild of Muskoka) was keen to share fabric bits with you for this block. 

(Mary had a pile available for the taking at the January 13th meeting.)  From your stash, add pinks and reds.

Inspiration came from Amanda Jean Nyberg's quilt, Chain of Diamonds, from her book No Scrap Left Behind 


and from Rayna Gillman's quilt on the cover of her book Create Your Own Improv Quilts."

Use nine 4.5" white or white-on-white squares. (Kona White was used in our examples.)

Sew a red or pink wonky bit onto opposite corners. 

Press and trim.  

Set up in a pleasing design.

Sew the squares into rows.

Sew the rows together to make a 12.5" block.
Enjoy!


Everything's Coming Up Roses - Part II - Making the Roses Square


Hi!  Wendi again chiming in on the blocks for our Fisher House charity quilt.  At the last guild meeting we had a discussion about how to join our flowers together for our "Everything's Coming Up Roses" quilt since they are all odd shapes and sizes.  Jill suggested that we add background fabrics to make them square.  We also talked about adding leaves to the blocks to give them some variety.

Laraine made a white block, so we decided leaves would make the block stand out more.  Here is the block she posted on FB:


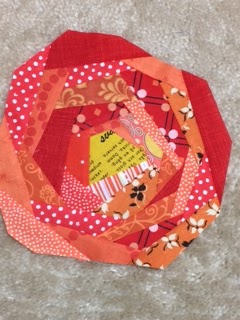
Then Jill posted her rose with the background filled out on Instagram:


These examples inspired me to give it a try, so I thought I would post here and tell you what I did.  (This is truly an example where social media made all the difference!  I had been dithering about how to do these blocks for weeks!)  

I don't know if this is the best way.  It is certainly not the only way.  But it is one way that worked and I am pleased with the look.   I do think that fleshing out these roses will make constructing our quilt much easier.

First, we want to use low volume prints with a white background and black or charcoal designs.  Your LV prints should have lots of white space, as you can see in the prints used in the blocks below.  Instead of "painting the roses red" (ala Alice in Wonderland) we're going to be "making our roses square."  In other words, we're trying to fill out our blocks to 90-degree corners in either squares or rectangles.  There is no particular size requirement, as long as the blocks are square or rectangular.  That will help us join the blocks together when we piece the quilt. 


If you have followed the instructions in Everything's Coming Up Roses Part I, you have created a rose with an irregular shape.  The challenge, then, is to give it 90-degree corners.

First, you might want to add some leaves to your block.  Here's how I did that:

 
Choose a green solid or print for your leaves.  This one happens to be an apple green scrap from my scrap bin.

Line it up with one of the odd angles on your rose block and stitch.  Be sure to use 1/4" seams.

Take your block to the ironing board and press the leaf just as you would if it was another round of the rose.  Press your seams to the outside.

This time, your objective is to get to 90-degree angles, so trim your leaf to assist you in doing that.


One thing I found helpful was to add leaves to the sides with the most acute angles, where adding the leaves made the rose look more natural.  This block might look better (less trapezoidal) with a leaf on the left side.  It might be fun to sew a background strip and a green leaf piece together and add it.  I didn't try that, but it might add some fun variety.

Add some more leaves to other flower edges in the same manner.

I've heard there is a rule somewhere in flower arranging that says odd numbers are pleasing, so maybe add 1, 3 or 5 leaves, depending on your flower.


Now add your border fabrics to all the sides.  Some of these will be odd angles and take more than one seam, as you can see on the right under the ruler.  If you have one, use a square-up ruler to trim your blocks to 90-degree corners.  Try to leave at least 1-inch all the way around, but if you have larger borders, that is OK.


Keep adding borders and squaring up until you have borders all the way around your block.

It's not necessary to use the same fabric on all your borders.  We will be joining different fabrics as we join the blocks, so it is OK to use different background prints within one rose block.

Have fun creating beautiful rose blocks for our "Everything's Coming Up Roses" quilt!  Let me know if you have questions or suggestions.


Everything's Coming Up Roses - An Improv Rose Tutorial


Hi!  This is Wendi, and I am the project manager for our Q2 community outreach quilt. 

Once again we've agreed to make a quilt for Fisher House of the Emerald Coast supporting their silent auction and gala, a major fundraising event which benefits military and military families during times of medical need.

The vision for 2017's quilt is a bed of roses - literally!  The blocks are improvisationally pieced roses inspired by Corey Yoder's Newtown Auction Pillow.  Corey used a Quilt As You Go (QAYG) method, but our roses are going to remain unquilted until the top is put together.

Using the method below, you may create roses any size between 6" and 18".  As you can see, these blocks are not square, so you will have estimate their size.  They can be any color that you might see actual roses growing in a garden, although you might wish to stay away from white, since our background is going to be low volume on white.  The blocks are super scrappy, but try to stay within one general color family - reds, oranges, pinks, yellows, etc.    It's ok if your fabrics have other colors in them, but the fabrics should "read" your primary color.


So get out your scrap bag and let's get started. 


Choose a small scrap of yellow or orange for your center.  Since my block is going to be orange, I chose yellow.  If your block is square, cut some of the corners off so that it is NOT square.  I like to start out with 5 sides.


Choose the fabric for your first strip.  It should be between 1" and 2-1/2" wide and slightly longer than the side of the center you intend to attach it to.  You may use solids mixed in with your prints, but please do not use all solids. I generally start with narrower pieces and gradually add wider strips.  Remember that you will be trimming the width frequently, so try not to begin with extremely narrow pieces.

Tip 1:  Since the pieces in my scrap box tend to be very wrinkled, I find it helpful to press each piece before I sew them together.  You may use starch, but I find that a light sprinkling of water or steam works well. 

Tip 2:  Since some of your edges will be on the bias, be careful not to stretch too much when you stitch and press.

Tip 3:  Be sure to use a 1/4" seam.  Seams that are too narrow tend to fray and pull apart, and we want our quilts to have quality construction.


Sew the two fabrics together.


Press the seam away from the center.


Trim off the excess.


Trim the other side.  Try to avoid 90-degree angles.


Repeat the process on another center edge.  Stitch.


Press.


Trim.


Trim the other side.

Repeat, building your rose "log-cabin style", adding a new strip to the next side in order, although it doesn't matter if you build to the left or to the right each time.


Stitch.


Press.


Trim.  Here, I trimmed off the 2nd strip so that it was at an angle.  Be sure to leave more than 1/4" all along your strip for your seam allowance.


Trim the other side and cut your strips at different angles each time to give interest to your "rose."


Repeat the entire process - Stitch.  Press.  Trim.... working your way around and around your "rose." 


Trim off odd corners and try to avoid 90-degree angles and straight strips.


If you notice that you have a "corner" approaching 90-degrees, cut it off.  As your "rose" grows, this will create a number of new "sides" to your flower.


Keep adding rows...


Pressing...


Trimming...


Avoiding straight strips and 90-degree corners...


And "grow" or "build" your flower...


Around and around until you are satisfied with its size...


Give it one last trim....


Until it makes you happy. 


I try to balance the colors to avoid all the darker fabrics being on one side, but honestly, no matter how you put them together, these "roses" are pretty.


If you have any questions, give me a shout!

The End of an Era

 Hello Modern Quilters! Thank you for visiting our blog. Sadly, ECMQG is no longer meeting on a regular basis. Feel free to browse the blog,...