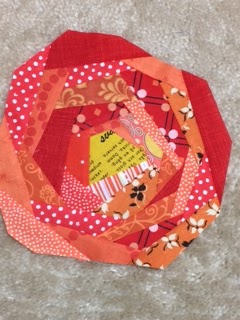
Everything's Coming Up Roses - Part II - Making the Roses Square


Hi!  Wendi again chiming in on the blocks for our Fisher House charity quilt.  At the last guild meeting we had a discussion about how to join our flowers together for our "Everything's Coming Up Roses" quilt since they are all odd shapes and sizes.  Jill suggested that we add background fabrics to make them square.  We also talked about adding leaves to the blocks to give them some variety.

Laraine made a white block, so we decided leaves would make the block stand out more.  Here is the block she posted on FB:


Then Jill posted her rose with the background filled out on Instagram:


These examples inspired me to give it a try, so I thought I would post here and tell you what I did.  (This is truly an example where social media made all the difference!  I had been dithering about how to do these blocks for weeks!)  

I don't know if this is the best way.  It is certainly not the only way.  But it is one way that worked and I am pleased with the look.   I do think that fleshing out these roses will make constructing our quilt much easier.

First, we want to use low volume prints with a white background and black or charcoal designs.  Your LV prints should have lots of white space, as you can see in the prints used in the blocks below.  Instead of "painting the roses red" (ala Alice in Wonderland) we're going to be "making our roses square."  In other words, we're trying to fill out our blocks to 90-degree corners in either squares or rectangles.  There is no particular size requirement, as long as the blocks are square or rectangular.  That will help us join the blocks together when we piece the quilt. 


If you have followed the instructions in Everything's Coming Up Roses Part I, you have created a rose with an irregular shape.  The challenge, then, is to give it 90-degree corners.

First, you might want to add some leaves to your block.  Here's how I did that:

 
Choose a green solid or print for your leaves.  This one happens to be an apple green scrap from my scrap bin.

Line it up with one of the odd angles on your rose block and stitch.  Be sure to use 1/4" seams.

Take your block to the ironing board and press the leaf just as you would if it was another round of the rose.  Press your seams to the outside.

This time, your objective is to get to 90-degree angles, so trim your leaf to assist you in doing that.


One thing I found helpful was to add leaves to the sides with the most acute angles, where adding the leaves made the rose look more natural.  This block might look better (less trapezoidal) with a leaf on the left side.  It might be fun to sew a background strip and a green leaf piece together and add it.  I didn't try that, but it might add some fun variety.

Add some more leaves to other flower edges in the same manner.

I've heard there is a rule somewhere in flower arranging that says odd numbers are pleasing, so maybe add 1, 3 or 5 leaves, depending on your flower.


Now add your border fabrics to all the sides.  Some of these will be odd angles and take more than one seam, as you can see on the right under the ruler.  If you have one, use a square-up ruler to trim your blocks to 90-degree corners.  Try to leave at least 1-inch all the way around, but if you have larger borders, that is OK.


Keep adding borders and squaring up until you have borders all the way around your block.

It's not necessary to use the same fabric on all your borders.  We will be joining different fabrics as we join the blocks, so it is OK to use different background prints within one rose block.

Have fun creating beautiful rose blocks for our "Everything's Coming Up Roses" quilt!  Let me know if you have questions or suggestions.


Summer SpinOut - July 2017 Block Lottery

To say we were excited about the Kona's 2017 Color of Year announcement is an understatement.  


Nothing says Florida (or summer or fun) like Flamingo Pink. 


It's an iconic association, along with orange groves, beaches, and alligators, that immediately comes to mind when you think of the state we call home.  

We (your ECMQG 2017 Board) knew we wanted to use it several different times throughout the year for guild projects.

  
As soon as Faye mentioned showcasing Flamingo for her stint as the July Block Lottery hostess, we jumped.

Years ago, like we all do whether from Pinterest, a blog, Flickr, etc., Faye saw a tutorial for a block that she wanted to make.  Also like many of us, she never actually found the time to do so.  That sad tale ends here, because Faye found the tutorial, chose her colors and fabric inspiration, and presented it last week.

For the month of July, Faye asks that we make SpinOut, a block and tutorial John Q. Adams, aka quiltdad, designed for The Desperate Housewife's Quilt blogfest.  (Strap yourself into the Way Back Machine.  This happened back in blogland during 2011, which is eons ago in the age of changing social media platforms.)


Colors are Kona Flamingo (or a pink that is REALLY close such as Kona Melon or Kona Punch), a solid gray (more on that in a moment), and a print that has Flamingo in it. 


Natalie helped determine the color challenge.  When selecting the gray - any shade/any manufacturer - fabric, look for the VALUE difference (contrast) between it and the Kona Flamingo.  We found during Saturday's meeting, there is little to no contrast between Flamingo and Kona Medium Gray.  

Notice in the mosaic below, the contrast between the two solid fabrics is lost in the images on the right.  That's what you want to avoid.  

  
Faye said the things she liked best when constructing her sample blocks was the ability to fussy cut her favorite Tula Pink images and the ease and organization that chain piecing allowed.  Additionally, she particularly liked the secondary pinwheel design the little flamingo corners make once multiple blocks are positioned next to each other.  


Please refer to Faye's blocks for visual placement of your fabrics.  John's tutorial can be found here.

You will need to cut fabric as follows for each 8.5" (unfinished) block:

Cut four (4):
Flamingo - 2.5" x 2.5"
Print - 2.5" x 4.5"
Gray - 2.5' x 2.5" AND 2.5" x  4.5"

Let us know your thoughts.  To make a decent sized quilt with no sashing or borders, we'll need to receive 56 blocks.  It's a good thing these are a fast make! 

Everything's Coming Up Roses - An Improv Rose Tutorial


Hi!  This is Wendi, and I am the project manager for our Q2 community outreach quilt. 

Once again we've agreed to make a quilt for Fisher House of the Emerald Coast supporting their silent auction and gala, a major fundraising event which benefits military and military families during times of medical need.

The vision for 2017's quilt is a bed of roses - literally!  The blocks are improvisationally pieced roses inspired by Corey Yoder's Newtown Auction Pillow.  Corey used a Quilt As You Go (QAYG) method, but our roses are going to remain unquilted until the top is put together.

Using the method below, you may create roses any size between 6" and 18".  As you can see, these blocks are not square, so you will have estimate their size.  They can be any color that you might see actual roses growing in a garden, although you might wish to stay away from white, since our background is going to be low volume on white.  The blocks are super scrappy, but try to stay within one general color family - reds, oranges, pinks, yellows, etc.    It's ok if your fabrics have other colors in them, but the fabrics should "read" your primary color.


So get out your scrap bag and let's get started. 


Choose a small scrap of yellow or orange for your center.  Since my block is going to be orange, I chose yellow.  If your block is square, cut some of the corners off so that it is NOT square.  I like to start out with 5 sides.


Choose the fabric for your first strip.  It should be between 1" and 2-1/2" wide and slightly longer than the side of the center you intend to attach it to.  You may use solids mixed in with your prints, but please do not use all solids. I generally start with narrower pieces and gradually add wider strips.  Remember that you will be trimming the width frequently, so try not to begin with extremely narrow pieces.

Tip 1:  Since the pieces in my scrap box tend to be very wrinkled, I find it helpful to press each piece before I sew them together.  You may use starch, but I find that a light sprinkling of water or steam works well. 

Tip 2:  Since some of your edges will be on the bias, be careful not to stretch too much when you stitch and press.

Tip 3:  Be sure to use a 1/4" seam.  Seams that are too narrow tend to fray and pull apart, and we want our quilts to have quality construction.


Sew the two fabrics together.


Press the seam away from the center.


Trim off the excess.


Trim the other side.  Try to avoid 90-degree angles.


Repeat the process on another center edge.  Stitch.


Press.


Trim.


Trim the other side.

Repeat, building your rose "log-cabin style", adding a new strip to the next side in order, although it doesn't matter if you build to the left or to the right each time.


Stitch.


Press.


Trim.  Here, I trimmed off the 2nd strip so that it was at an angle.  Be sure to leave more than 1/4" all along your strip for your seam allowance.


Trim the other side and cut your strips at different angles each time to give interest to your "rose."


Repeat the entire process - Stitch.  Press.  Trim.... working your way around and around your "rose." 


Trim off odd corners and try to avoid 90-degree angles and straight strips.


If you notice that you have a "corner" approaching 90-degrees, cut it off.  As your "rose" grows, this will create a number of new "sides" to your flower.


Keep adding rows...


Pressing...


Trimming...


Avoiding straight strips and 90-degree corners...


And "grow" or "build" your flower...


Around and around until you are satisfied with its size...


Give it one last trim....


Until it makes you happy. 


I try to balance the colors to avoid all the darker fabrics being on one side, but honestly, no matter how you put them together, these "roses" are pretty.


If you have any questions, give me a shout!

Fractured Curves - June 2017 Block Lottery

Greetings Modern Quilters!
I’m Natalie and here is this month’s block lottery. 
I drew upon two awesome creators for this block, Carole Lyles Shaw and Anne Deister at SpringLeaf Studios.
We are having some improv fun this month with a beautiful block that Carole Lyles Shaw developed for the 2016 Cloud9 New Block Blog Hop called Fractured Curves. Carole describes herself as a modern quilt designer, author, and workshop instructor. She takes a modern, improvisational approach to her quilting projects and enjoys the free expression and individualism that modern quilting embraces. You can find out more about Carole at her website carolelylesshaw.com
We are also experimenting with an analogous color scheme and Anne Deister of SpringLeaf Studios wrote a blog with a great visual of all the analogous combinations on the color wheel we are studying, along with stunning photos that are helpful. With a background in graphic design, Anne confesses a love for combining fabric patterns and colors and her obsession is now a full-time pursuit. You can find out more about Anne at her website springleafstudios.com
With this block, we will explore two different skill sets – improvisational piecing with drunkards path blocks, slicing, rearranging, adding – AND the analogous color scheme with a 4 step value change.
LETS GET STARTED!

FABRIC REQUIREMENTS:
Each block requires 4 – 10” square pieces.
One 10” square must be EITHER – Kona, Bella, Blake, Miller WHITE OR Alison Glass Abacus Carved in Charcoal
Before choosing your next 3 fabrics, read through Anne’s blog post Analogous Colors (November 27, 2015) Analogous Colors blog by SpringLeaf Studios

The remaining 3 fabric 10” squares must be SOLID, Moda Grunge, or Moda Grunge Hits the Spot in any combination you choose. They must represent an analogous color scheme – meaning they are right next to each other on the color wheel. You may choose 1, 2 OR 3 colors. Regardless of how many colors you choose, you must have 3 different values represented. Use the mono or black and white setting on your phone and select a light, medium, and dark value. 

You will also need 2 pieces approximately 4”x7.5”. You won’t use these until the very end so don’t cut these out yet - see Tip for Step 11.

SEWING
Carole created a free detailed tutorial for the block
HERE ARE SOME ADDITIONAL TIPS:
·       Starch those 10” squares before cutting. Because we are working with curves, there is a tendency to stretch the fabric on the bias which makes wonky things happen. Starch will help the fabric retain its shape.
·      In step 2, Carole cuts from R to L going down – it was easier for me to go from R to L in an upwards direction.
·      In step 3, I placed my top fabric away from the edge about ½” – 1” and continued sewing. My result was more balanced. 

·      In step 4, I ironed out toward the “L” shape regardless of light or dark. There was less bunching of the eased-in fabric. 
·       At the end of step 9 – you could be finished, the block looks pretty cool, but keep going!!!
·       In step 10, I cut through the block on the diagonal right through that very middle seam where the 4 different fabrics intersect – the 5” measurement didn’t work for me for some reason. Use whatever angle you want here as long as you cut through that intersection.

·      In step 11, for the 4” x 7.5” pieces you have 3 choices:
o   Continue to follow Carole’s directions,
o   Make your own scrappy fabric from your trimmings,
o   OR choose a single piece of fabric in one or two of your 4 colors. I like this one best.
·       In step 14, trim to 12.5” square. YOU decide what sections to keep and what sections to cut off. The best part, SAVE what you cut off. If you turn in these final trimmings in with your block you receive two tickets, WOW!
Remember to use hashtags for our social media friends
@carole_lylesshaw #fracturedcurves #springleafstudios
Have fun sewing improvisationally!
Natalie
@nurturecreations


The End of an Era

 Hello Modern Quilters! Thank you for visiting our blog. Sadly, ECMQG is no longer meeting on a regular basis. Feel free to browse the blog,...