Showing posts with label March 2016. Show all posts

Fabric Swap!


The first fabric swap of the year is happening and it's a good one - text and typography fabrics!  

Laraine, your 2016 Swap Hostess, ran a quick survey on Facebook where it was neck and neck between Moda Grunge and text-y prints.  Text prints won.

For our newbies who might not have participated in fabric swapping, let us help you with some FAQs.

What is a fat eighth?
A fat eighth is half of a fat quarter.  There are two measurements that can be cut.  We use the 11" x 18" cut.  

How many yards of fabric can I swap?
Three.  Each yard must be different.

Why can't I swap three yards of the same fabric?
Because variety is the spice of life.  Your fellow swappers want variety.

What kind of fabric is allowed?
Please use quilt shop quality fabric.  It feels better.  It's more tightly woven.  The inks and dyes used in the manufacturing process are higher quality.  Please, DO NOT SWAP fabric purchased from big box retailers.

How do I participate?
Use the comments section on this post to sign-up.  Or, send us an Email to emeraldcoastmqg @ gmail  dot com telling us. 

Where do I post my fabric pictures?
There is an album in our CLOSED Facebook group.  You have to select Photos, Album, F8 Fabric Swap March 2016, Add Photos.

I'm not on Facebook.  How do I post pictures?
Send us an Email to emeraldcoastmqg @ gmail dot com.

I want to participate, but will miss the meeting.  What do I do?
Send your fabric with a friend.  Or, mail it to ECMQG at our PO Box.  If you want it mailed back, include a postage paid flat rate padded envelope along with your fabric.  

We will do our best not to give you duplicate fabrics, however, it MAY happen, it COULD happen, it HAS happened.  

Sending us pictures, and/or uploading to the album, helps avoid this situation.

Your fabric sorters thank you in advance! 

Also, your fabric sorters would like each yard of fabric packaged individually.  If you're swapping two yards, you need two bags of fabric; three yards need three bags.  

March Block Lottery - Making Tracks (Part 2)

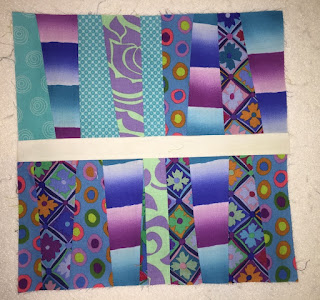
Sooooo...  We're setting out to make a block that looks kinda like the ECMQG logo.  I think that's very cool.  This is one block I will be making "for real-for real" (as my students say.)

Elaine gave us a basic tutorial in yesterday's post.  Today, Cindy has some tips and tricks that may help us enjoy the ride.


Gather some assorted scraps, including prints and solids of varying widths, each between about 1.5" x 8".  You will also need a piece of Kona or Bella white 1.5" x 14'' or 1.5" x 15".  These measurements are slightly bigger than required in order to allow for trimming.  Wonkiness, for those who aren't used to it, has to have wiggle room.


Trim each scrap to a wedge shape.  (Three from this larger scrap.)


Be sure to vary the width and angle, because...


Random widths and angles allow for more movement.


Once cut, arrange the wedges in a pleasing format, alternating the skinny ends with the wider ends.  You need approximately 20" of unsewn wedges.  (Remember, every seam reduces your width by .5".)


Sew enough wedges together to create at least a 14" piece.  In the photo above, it's actually closer to 18" long because of the curves that started forming.  No biggie.  It's wiggle room.

Now, do it again.  You will need two wonky wedge units, each approximately 8" x 14" (or longer, depending on how curvy your piecing is). 


If sewing all the wedges at once is intimidating, try breaking them down into smaller chunks.  Three and four piece wedges are very manageable.


Press seams open using starch.  This sets your stitches and helps eliminate the stretch that comes from the slightly bias edges.


See?  Three sets of wedges, sewn, starched, pressed and ready for trimming.


Choose one side of  a wonky wedge unit and trim to a nice straight edge.  Notice how the 6.5" ruler has a little bit of fabric peeking out on the left?  That's a good thing.  It means there's wiggle room.


Attach the 1.5 inch strip of Kona (or Bella) white to the trimmed pieces.  Press towards the white. 


In this picture, note that the second unit isn't the same size as the first.  This is the all-important wiggle room I talked about.  It's needed because of being wonky.  Don't worry.  Play, and reposition unit 2, until you are satisfied with how your patterns, or colors, or wedge shapes align (or don't) with the piece you've already sewn.  Once you're satisfied, sew the second piece to the long side of the Kona/Bella strip.


Trim your block to 12.5" x 12.5" CENTERING that Kona/Bella strip.  


Pretty straight forward, we hope.  Embrace wonkiness!  Dive right in!  You can do it! 

Let's have a table full of Making Tracks blocks next month!  

March Block Lottery - Making Tracks (Part 1)

The End of an Era

 Hello Modern Quilters! Thank you for visiting our blog. Sadly, ECMQG is no longer meeting on a regular basis. Feel free to browse the blog,...